
Become a Hooks Pro: A Hands-on Guide to useState and useEffect in React
React hooks are a new feature in React that lets you use state and other React features without writing a class. They were introduced in React 16.8.

I'm a full-stack developer specializing in building (and occasionally designing) exceptional digital experiences. Currently, I'm focused on building responsive full-stack web applications.
What is the purpose of hooks?
Hooks allow you to use state and other React features without writing a class. This means you can use React without having to learn about classes, which can be confusing for some people.
Hooks make it easier to reuse stateful logic between components. With classes, you often have to create higher-order components or render props to share stateful logic between components. With hooks, you can easily share stateful logic by extracting it into a custom hook, which can be reused in multiple components.
Hooks make it easier to manage the state of your application. With classes, you have to manage the state of your component using lifecycle methods, which can be difficult to understand and debug. With hooks, you can use the useState hook to manage the state of your component simply and straightforwardly.
Hooks make it easier to test your components. With classes, you often have to use complex methods like spyOn or jest.mock to test the behavior of your components. With hooks, you can easily test the behavior of your components by testing the output of your custom hooks.
// This is a class-based component
class Example extends React.Component {
  state = {
    count: 0
  };

  handleClick = () => {
    this.setState(prevState => ({
      count: prevState.count + 1
    }));
  };

  render() {
    return (
      <div>
        <p>You clicked {this.state.count} times</p>
        <button onClick={this.handleClick}>
          Click me
        </button>
      </div>
    );
  }
}

// This is a functional component that uses the useState hook
function Example() {
  // Declare a new state variable, which we'll call "count"
  const [count, setCount] = useState(0);

  return (
    <div>
      <p>You clicked {count} times</p>
      <button onClick={() => setCount(count + 1)}>
        Click me
      </button>
    </div>
  );
}
As you can see, the class-based component uses a class with a state variable and a lifecycle method to manage the state of the component and handle events. The functional component uses the useState hook to add state to the component, and a regular function to handle events.
Both components do the same thing, but the functional component is shorter and easier to understand. The hook is more declarative and explicit, which makes it easier to reason about the behavior of the component.
In general, hooks provide a simpler and more flexible way to add features to React components, compared to classes. They allow you to use state and other React features without writing a class, and make it easier to reuse, test, and understand your code.
In today's discussion, we will delve into the world of React hooks, specifically focusing on the useState and useEffect hooks.
useState:
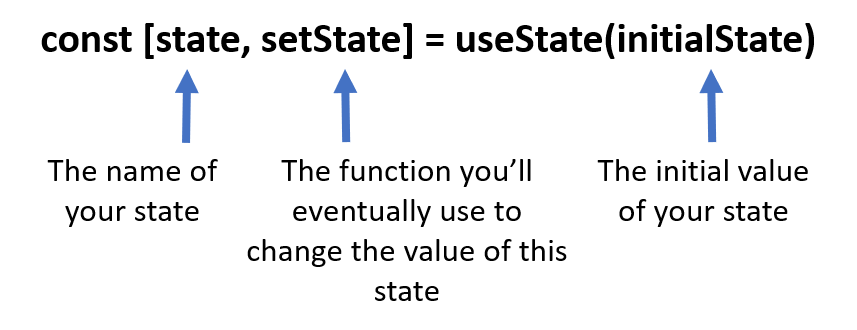
The useState hook takes a single argument, which is the initial state of the component, and returns an array with two elements: the current state and a function that can be used to update the state.
In this example, the useState hook is used to add state to the Example component. The initial state is 0, and the setCount function is used to update the state when the button is clicked. The count variable holds the current value of the state, which is displayed in the p element.
Calling the
setfunction does not change the current state in the already executing code.It only affects whatuseStatewill return starting from the next render.
In the code, the handleName function is modifying the component's state using the setName function, but the state update is not applied immediately. This is because state updates in React are asynchronous, which means that they are not applied immediately but are scheduled to be applied at some point in the future.
This means that when you call the setName function in the handleName function, the component's state is not immediately updated. Instead, the update is scheduled to be applied at a later point in time. This is why the console.log statement logs the value of name as "Vaibhav" instead of "Robin", even though the setName function was called to update the state.
To get the updated value of the component's state, you can either:
Wait for the update to be applied: The state update will eventually be applied, and you can use the updated value of the state by accessing it through the component's state variable (e.g.,
namein this case).Use a state updater function: The
setNamefunction that is returned by theuseStatehook is actually a state updater function, which takes a function as an argument and returns a new state value. You can use this function to get the updated value of the state by passing a function that returns the new state value to thesetNamefunction.function handleName() { setName(prevName => { console.log(prevName); // "Vaibhav" return 'Robin'; }); }In this example, the state updater function passed to
setNamereceive the previous value of the state as an argument (prevName). The function can then use the previous value of the state to calculate the new state value, which in this case is simply "Robin". The state updater function returns the new state value, which is then used to update the component's state.The initial state can be a function: Instead of passing a simple value as the initial state, you can also pass a function that returns the initial state. This can be useful if the initial state depends on props or some other value that is not available at the time the component is defined.
const [count, setCount] = useState(() => getInitialCount());useEffect:
The
useEffecthook is a way to add side effects to functional components in React. Side effects are operations that have an effect on the component or the application outside of the component itself, such as data fetching, DOM manipulation, or logging.The
useEffecthook takes a function as an argument, which is called the effect function. The effect function is called after the component has rendered, and it can be used to perform side effects.useEffect(setup, dependencies?)The
setupfunction in React is used to define the logic for an Effect. It can also optionally return acleanupfunction. When a component is first added to the DOM, React will run thesetupfunction. After every re-render with changed dependencies, React will first run thecleanupfunction with the old values and then run thesetupfunction with the new values. When a component is removed from the DOM, React will run thecleanupfunction one last time. This is to ensure proper cleanup and prevent memory leaks.The
dependenciesare a list of all reactive values that are referenced inside thesetupcode. Reactive values include props, state, and all variables and functions declared directly inside a component's body. If a linter is configured for React, it will verify that every reactive value is correctly specified as a dependency. The list of dependencies must have a constant number of items and be written inline, like [dep1, dep2, dep3]. React will compare each dependency with its previous value using the Object.is a comparison algorithm. If the dependencies are not specified, the Effect will re-run after every re-render of the component.
The useEffect hook does not return any value, it returns undefined as it is used for setting up side-effects only. It is used to synchronize a component with an external system, and it does not produce any values that can be rendered. Instead, it makes changes to the component or the application's state, and schedule a re-render if necessary.
It is important to keep in mind that, if you have any return statement in the setup function, it will be ignored.
import { useEffect, useState } from 'react';

function MyComponent({ id }) {
  const [data, setData] = useState(null);

  useEffect(() => {
    async function fetchData() {
      const response = await fetch(`https://my-api.com/data/${id}`);
      const json = await response.json();
      setData(json);
    }
    fetchData();
  }, [id]);

  return (
    <div>
      {data ? <div>{data.name}</div> : <div>Loading...</div>}
    </div>
  );
}
In this example, the useEffect hook is used to fetch data from an API whenever the id prop changes. The setup function is the async function fetchData that makes the API call and updates the component's state with the fetched data, and the dependency is the id prop.
When the component is first rendered, the setup function will run and the data will be fetched and stored in the data state variable. After that, whenever the id prop changes, the setup function will run again and the data for the new id will be fetched and stored in the data state variable, this will cause the component to re-render with the new data.
It's important to notice that, the function passed to useEffect should not be an async function, so that's why we use the async function inside it.
Race condition in useEffect:
A race condition occurs when the outcome of a program or system depends on the relative timing or order of events. In the context of React and the useEffect hook, a race condition can occur when an effect relies on a state variable that is updated in an asynchronous way, such as a network request or a setTimeout.
const [data, setData] = useState(null);
useEffect(() => {
  setData(null);
  fetch('https://example.com/data')
    .then(response => response.json())
    .then(data => setData(data));
}, [data]);
In this example, when the component first renders, the useEffect hook is called, and it sets the data variable to null and starts a network request. However, since the network request is asynchronous, it may take some time to complete. Meanwhile, the component may re-render, and the useEffect hook will be called again. If the network request completes before the second render, it will set the data variable to the new value, but if the second render happens before the network request completes, it will set the data variable to null again. This can cause unexpected behavior and is called a race condition.
Solution?
To avoid race conditions, it's important to use techniques like the use of a flag variable or useEffect dependencies correctly,AbortController API.
- Using flag Variable:
In the previous example, one way to avoid the race condition is to add a flag variable that keeps track of whether the network request is in progress or not and use it as a dependency in the useEffect hook.
const [data, setData] = useState(null);
const [isLoading, setIsLoading] = useState(false);
useEffect(() => {
  if (!isLoading) {
    setIsLoading(true);
    fetch('https://example.com/data')
      .then(response => response.json())
      .then(data => {
        setData(data);
        setIsLoading(false);
      })
      .catch(error => {
        console.error(error);
        setIsLoading(false);
      });
  }
}, [isLoading]);
In this example, the isLoading variable keeps track of whether the network request is in progress or not. The useEffect hook only runs when isLoading is false, this means that the effect will only run once until the request is finished and the isLoading variable is set to false again, by this way, it will prevent the race condition, and the re-rendering of the component with unexpected values.
Also, the catch block handles the error that occurred during the network request, by logging it to the console and setting the isLoading variable to false.
use the
AbortControllerAPI:Use the cleanup function: A cleanup function can be returned from the setup function, it's used to clean up any changes made by the effect, it's important to handle the cleanup of resources like event listeners, network requests, or timers.
const [data, setData] = useState(null);
useEffect(() => {
  let abortController = new AbortController();
  setData(null);
  fetch('https://example.com/data', { signal: abortController.signal })
    .then(response => response.json())
    .then(data => {
      if (!abortController.signal.aborted) {
        setData(data);
      }
    });

  return () => {
    abortController.abort();
  };
}, [data]);
In this example, we're creating an AbortController object at the beginning of the effect. This object has a signal property which is passed as an option to the fetch call. signal property allows us to abort the request by calling the abort() method on the AbortController object.
The return function inside useEffect is used as a cleanup function and it's called when the component unmounts or the dependencies change, it calls the abort() method of the AbortController, this will stop the request, and prevent the race condition.
Also, the then block of the fetch call, it checks if the request is not aborted, if it's not, it sets the data state. It's important to note that the AbortController API is not supported by all browsers, you should check for its support before using it.
It's easy to see how useEffect works with this simple flow chart:

In conclusion, React hooks have revolutionized the way we think about and write React components. The useState and useEffect hooks are just the tip of the iceberg when it comes to the capabilities of React hooks. These two hooks alone can greatly simplify and streamline the way we manage state and side-effects in our React components. In my next blog, I will delve deeper into the world of React hooks and explore some of the other important hooks that are available to us. Stay tuned!


